To stop heels from slipping out of loafers and flats, match the fix to the physical cause rather than defaulting to a back-of-heel cushion. A pad stuck behind the heel often pushes the toes forward into the front wall without securing the foot. If your foot sits too low inside the shoe, place a felt or leather tongue pad under the instep. If the heel cup itself is too wide, install a suede heel grip. If a rigid outsole pulls the heel down with every step, flex the sole manually across the ball of the foot to soften its break line.
Why Shoes Slip When the Length Feels Right
Loafers and ballet flats lack laces, straps, or buckles to anchor the foot. They rely entirely on three mechanical points: the height of the vamp (the upper cover across your midfoot), the width of the heel counter (the rigid back cup), and the flex of the outsole.
When a shoe slips despite feeling correct in the toe box, one of three physical mismatches is usually happening:
- Low instep volume: Your foot does not fill the vertical space beneath the vamp. With every step, your foot glides forward, leaving empty space behind your heel.
- Sole rigidity leverage: Thick leather outsoles or Goodyear-welted construction resist bending when your toes flex. Instead of arching with your foot, the rigid sole acts as a lever, pulling the back of the shoe straight down off your heel.
- Heel counter geometry: Shoes are made on standardized lasts that assume a specific ratio between forefoot width and heel width. If you have a narrow heel relative to your forefoot, the back of the shoe remains loose even when the toe box fits snugly.
Diagnostic Steps Before Buying Inserts
Put on the exact socks or tights you plan to wear with the shoes. Stand on a hard surface and pay close attention to how your foot moves during a natural stride.
- Test for excess instep space: Pinch the upper material over the top of your foot while standing. If you can pinch a fold of material or feel space between your skin and the shoe lining, your instep volume is too low.
- Test for sole stiffness: Walk forward slowly. If your forefoot bends but the bottom of the shoe stays flat, the sole is levering your heel out of the shoe.
- Test for heel cup width: Stand still and check the sides of your heel bone. If there is lateral space on either side of your heel while your toes touch the front wall, the heel counter is too wide for your foot structure.
- Test for lining friction: If your foot slides only when wearing sheer nylon tights or smooth synthetic socks, the issue is surface slickness rather than shoe volume.
Tongue Pads for Low Insteps
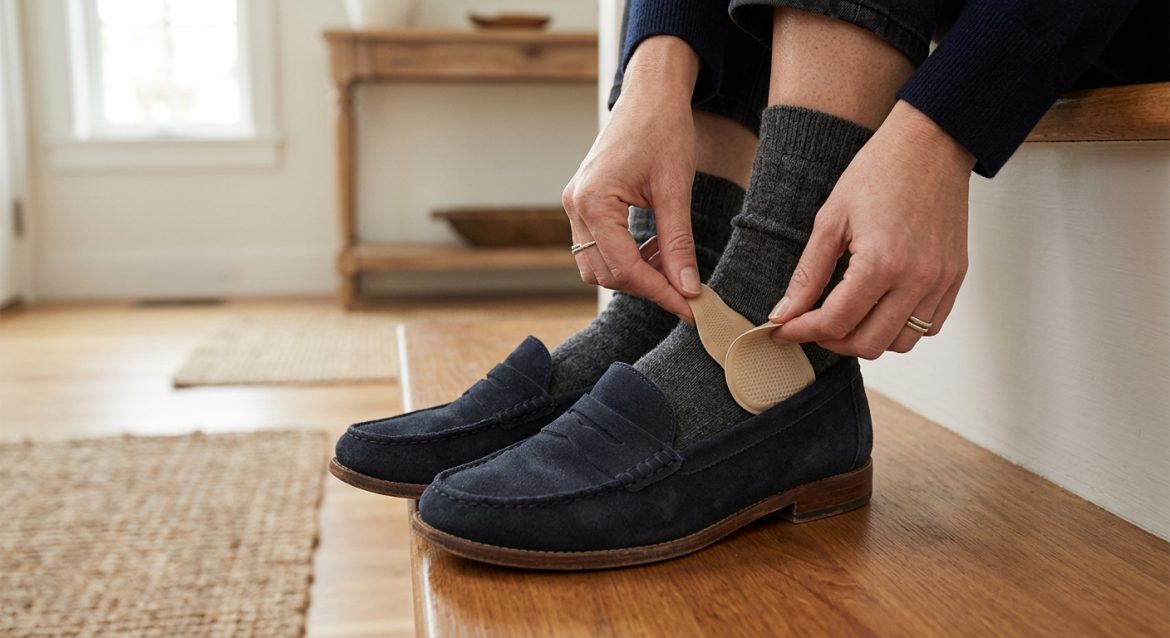
If your foot sits low in the shoe, adding a cushion to the back of the heel pushes your toes forward into the toe box. A tongue pad solves the problem from above.
Made of felt, foam, or leather with an adhesive backing, a tongue pad sticks to the underside of the shoe's vamp or tongue. It fills the dead space over your midfoot, gently pushing your foot back and down into the heel cup without reducing toe room or altering the external shape of the shoe.
To install a tongue pad correctly:
- Peel off the protective backing from a thin felt or leather pad.
- Reach inside the shoe and press the pad against the underside of the leather upper, directly over where your arch peaks.
- Walk across the room. If the top of your foot feels pinched, shift the pad slightly forward toward the toe box.
Heel Grips for Wide Heel Cups
When the back counter of the shoe is genuinely wider than your heel, a dedicated heel grip narrows the heel cup and adds friction.
Material selection determines comfort and durability:
- Suede grips: Real or synthetic suede offers the best balance of friction and longevity. The subtle nap grabs your sock or skin lightly without creating intense friction points that cause blisters.
- Silicone gel grips: These work on smooth synthetic linings, but they tend to attract lint, lose adhesion over time, and stick excessively to bare skin, which can cause shear blisters.
- Smooth leather grips: These add volume to a slightly large shoe but provide minimal extra friction against smooth socks.
Strong acrylic adhesives on aftermarket grips can peel the top grain off unlined leather interiors or leave sticky residue on genuine suede linings. Test delicate shoes first by placing a strip of low-tack painter's tape inside the heel for a few hours to ensure the lining handles adhesive safely. For high-end unlined leather, consider non-adhesive inserts or friction-backed grips held in place by foot pressure.
Ball-of-Foot Pads and Half-Insoles for Overall Volume
If the shoe feels slightly roomier throughout or if your forefoot sits low, place a thin pad under the ball of your foot.
A ball-of-foot pad lifts the forefoot slightly, taking up excess room under the vamp and pulling the entire foot backward toward the heel counter. Gel pads provide cushioning on thin-soled flats, while felt or leather pads retain breathability inside classic leather loafers.
A three-quarter insole—running from the heel to just behind the toes—works better if your ankle bones sit too low against the shoe collar, causing both heel slip and painful rubbing against the ankle bone.
Softening Rigid Soles to Eliminate Heel Lift
New leather loafers with thick outsoles often slip simply because the sole refuses to bend. Before sticking permanent pads inside, break in the outsole flex manually.
Steps to flex a rigid leather sole safely:
- Hold the shoe firmly with one hand at the toe box and the other at the heel counter.
- Slowly bend the toe section upward toward the collar, flexing the sole along the natural break line where your toes bend.
- Repeat this motion 15 to 20 times per shoe.
- Work the leather around the back heel counter gently with your thumbs to soften internal stiffeners.
Never bend a dress shoe backward or flex it forcefully across the middle of the arch, which can snap the internal steel shank or warp the sole's waist.
Friction Adjustment via Socks and Liners
Fabric friction plays a major role in keeping unlaced shoes on your feet:
- Use silicone-lined no-show socks: Choose low-cut socks with multi-strip silicone grips around the interior heel perimeter. The silicone grips your skin while the cotton exterior grips the leather lining.
- Avoid slick synthetic combinations: Pairing smooth nylon stockings with polished, smooth leather shoe linings creates maximum slippage. If wearing tights, opt for suede-backed heel strips or liners with textured weave patterns.
Recommended Fix Sequence
To resolve heel slip systematically without damaging your shoes, follow this order:
- Check sole flexibility: If the outsole is rigid, flex it manually 15 to 20 times before adding any inserts.
- Assess instep volume: Slip a folded tissue under the shoe vamp. If your heel stays put when you walk, buy a felt or leather tongue pad.
- Evaluate heel cup width: If your instep is snug but the back of your foot still lifts, apply a suede heel grip.
- Adjust overall volume: If your foot glides forward into the toe box, install a ball-of-foot pad under the forefoot.
By matching the solution to the specific cause of slippage, you maintain comfortable toe clearance, preserve fine shoe linings, and secure your stride.